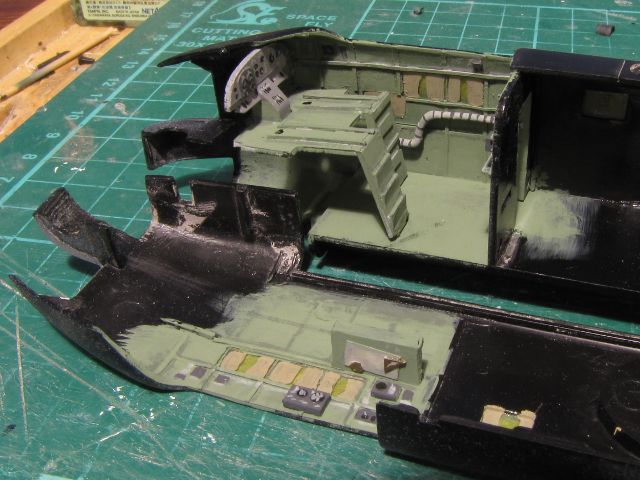
Added a bit of detail to the cockpit..
moved the navigators table up, as the floor is a bit low. I've noticed in most Stirling phots that there are curtains over the windows, so painted them on, be interestign to see how they look with the masking off.
I've got a pilot and navigator sorted out, just painting them. Hopefully finish this area in the next couple of days.
Cheers
Showing posts with label Airfix. Show all posts
Sunday, 11 March 2012
Saturday, 25 February 2012
Airfix - Short Stirling - windows and wings
You thought you could escape it.. but no it has to start with those windows..
Some interior green brushed on, then a light sand and some primer over the top to check, good enough. I promise I shall not mention them again.... well until the masks come off..
But some things I will mention and you cannot stop me, oh captive build followers... wings! I think I have finally got the trailing edges to a nice thin edge.. well one wing anyway..
a touch of filler in a sanded through section.
The leading edges all tidied up..
the oil cooler intakes shaped and some fins added, also the outlet vent on the top of the wing and the landing lights scratch built.
The under side has a bit of tidy up to go..
the front and rear of the under carriage doors have some huge gaps, that were filled with plasticard and had to add a bit of filler, as well edge of the flap panel line.
Those bomb cell doors, it looks like the whole section of the bomb cells are slightly lower than the surrounding wing area, as they have been sanded with a block across them, yet the whole area is still slightly hollow. They will have to do, at least the area is painted black.
The other wing, has been sanded to an inch of its life, and just added the plasticard for the vent fins.
cut the excess off and tidy up, then some primer for this wing as well.
Also got the tailplanes and fin cemented together and the moving surfaces cemented on, so they will be getting a jolly good sanding as well.
Cheers
Jim
Wednesday, 22 February 2012
Airfix - Short Stirling - window masks
Well after searching the house for metal tube to use as a cutter, or anything as a template, I decided to create the window shapes on the PC and print them onto Tamiya tape.
Put the tape on a piece of glass, then with a new scalpel blade in the handle, away we go. The glass is only a small piece so it can be turned while cutting around the curves.
The Tamiya tape is the wide stuff, 40mm, and its different stuff to the narrow stuff, seems thinner and has the name 'Kamoi Tape' in the centre of the roll.
Here are the cockpit windows masked..
I've masked the rear with a larger piece of tape than the outside of the windows, hopefully we don't get the double pane look.
I am feeling happier now.
Cheers
Jim
Put the tape on a piece of glass, then with a new scalpel blade in the handle, away we go. The glass is only a small piece so it can be turned while cutting around the curves.
The Tamiya tape is the wide stuff, 40mm, and its different stuff to the narrow stuff, seems thinner and has the name 'Kamoi Tape' in the centre of the roll.
Here are the cockpit windows masked..
I've masked the rear with a larger piece of tape than the outside of the windows, hopefully we don't get the double pane look.
I am feeling happier now.
Cheers
Jim
Sunday, 19 February 2012
Airfix - Short Stirling - windows
Finally got the cd case replacement windows in, and tidied up..
Lots of sanding, 150 grit to 1200 grit, then finished off with micro mesh pads, and I've brished a coat of Klear on both sides.
Now I've just got to figure out the easiest way to cut the window masks...
Lots of sanding, 150 grit to 1200 grit, then finished off with micro mesh pads, and I've brished a coat of Klear on both sides.
Now I've just got to figure out the easiest way to cut the window masks...
Wednesday, 15 February 2012
Airfix - Short Stirling - windows
I almost, can't put it off I have to start on the cockpit, and need to pop the windows in before I start, but the kit windows are not the best, dimpled, have very bright edges and worse they don't fit flush to the outer surface, also the individual rear fuselage ones are small and have big gaps around the glass.
So, what to do..... tried some PVA as a test to make windows, but they were distorted, and are not flush, the glue sets with a sag, so last resort is to use sections of CD cases...
I scribed around a section of windows, then used a razor saw to cut the section out. Held the fuselage over the CD case and scribed the hole, cut it out with a saw, and then sanded it to a nice tight fit, and cemented in. It is slightly proud so I can sand it flush to the fuselage. Then I'll mask the windows both sides and start detailing the cockpit.
I'll replace the rear fuselage windows with sections of CD case as well, and about five individual windows. A bit of work, but I'll be happier.
Fill'n Sand ahoy!
So, what to do..... tried some PVA as a test to make windows, but they were distorted, and are not flush, the glue sets with a sag, so last resort is to use sections of CD cases...
I scribed around a section of windows, then used a razor saw to cut the section out. Held the fuselage over the CD case and scribed the hole, cut it out with a saw, and then sanded it to a nice tight fit, and cemented in. It is slightly proud so I can sand it flush to the fuselage. Then I'll mask the windows both sides and start detailing the cockpit.
I'll replace the rear fuselage windows with sections of CD case as well, and about five individual windows. A bit of work, but I'll be happier.
Fill'n Sand ahoy!
Saturday, 11 February 2012
Airfix - Short Stirling - wings and things
Well there is a lot plastic in this kit, since I'm doing an early Stirling with no mid upper turret I've cut the moulded on faing away and added some card to blank it out.
I'm finding the sprue dissolved in the cement is working well, though sometimes it stays soft for a while, and when you sand it it balls up, too much cement maybe??
One wing had an inner nacelle edge moulded very thin, so I've backed it with card.
Also started cementing the wings together, need lots of clamps...
Used all my big clamps up here.
I noticed the wings have a slight longitudinal bow, so I though best way of cementing them, was by cementing the root and the inner nacelle first, letting it harden, and then do the rest of the wing.
Cementing in the bomb bay as well, so I can start to work on the cockpit. I'm wavering between using the vac canopy, then having to detail the cockpit or making the kit one fit and not worrying about cockpit detail.
Need to sort out a crew, I want to add a pilot, navigator, bomb aimer and rear gunner, but the kits ones are not the best.
All the best
Jim
I'm finding the sprue dissolved in the cement is working well, though sometimes it stays soft for a while, and when you sand it it balls up, too much cement maybe??
One wing had an inner nacelle edge moulded very thin, so I've backed it with card.
Also started cementing the wings together, need lots of clamps...
Used all my big clamps up here.
I noticed the wings have a slight longitudinal bow, so I though best way of cementing them, was by cementing the root and the inner nacelle first, letting it harden, and then do the rest of the wing.
Cementing in the bomb bay as well, so I can start to work on the cockpit. I'm wavering between using the vac canopy, then having to detail the cockpit or making the kit one fit and not worrying about cockpit detail.
Need to sort out a crew, I want to add a pilot, navigator, bomb aimer and rear gunner, but the kits ones are not the best.
All the best
Jim
Sunday, 5 February 2012
Airfix - Short Stirling - rivets and sinks..
A slow start, a bit daunted by the size and number of parts, jeepers. Oh well, one foot after the other.
I was reading the Stirling was flush riveted, and looking at photos I can't see rivets, so they are being sanded away. Have got the fuselage halves and wing top surfaces done.
Also have done a bit of scribing, just the fuel tank covers and some leading edge lines.
Sanding the rivets off have turned up a few sink marks on the fuselage and wing. Now I seem to have problems filling sink marks, I think its due to the bowl shape depression they tend to be with no sharp defined edges, unlike a gap or hole. They never seem to disappear completely, I think its the thin feathered edge of filler that's left. So I thought I'd try something new to me, sprue dissolved in Tamiya extra thin cement, I had an almost finished bottle and chopped up about three inches of sprue and dropped them in, its made a very gloopy sludgy stuff..
I've blobbed it into the sink holes I've uncovered so far, and am eager to see if it fills the sink holes better.
Have also cemented the closed undercart door panels in and made new wing bomb cells doors. The kit has two rivet coated doors for each bomb cell, and only has an edge at either short end. A bit of cutting, a scribed door line down the centre and a support in the cells for the doors.
There is a poser though, there are two slots at the rear of the undercarriage bays, I assume for the extended legs, now were these actually open slots on the Stirling or did they have covers?
Anyway full steam Fill'n Sanding...
I was reading the Stirling was flush riveted, and looking at photos I can't see rivets, so they are being sanded away. Have got the fuselage halves and wing top surfaces done.
Also have done a bit of scribing, just the fuel tank covers and some leading edge lines.
Sanding the rivets off have turned up a few sink marks on the fuselage and wing. Now I seem to have problems filling sink marks, I think its due to the bowl shape depression they tend to be with no sharp defined edges, unlike a gap or hole. They never seem to disappear completely, I think its the thin feathered edge of filler that's left. So I thought I'd try something new to me, sprue dissolved in Tamiya extra thin cement, I had an almost finished bottle and chopped up about three inches of sprue and dropped them in, its made a very gloopy sludgy stuff..
I've blobbed it into the sink holes I've uncovered so far, and am eager to see if it fills the sink holes better.
Have also cemented the closed undercart door panels in and made new wing bomb cells doors. The kit has two rivet coated doors for each bomb cell, and only has an edge at either short end. A bit of cutting, a scribed door line down the centre and a support in the cells for the doors.
There is a poser though, there are two slots at the rear of the undercarriage bays, I assume for the extended legs, now were these actually open slots on the Stirling or did they have covers?
Anyway full steam Fill'n Sanding...
Thursday, 2 February 2012
Airfix - Short Stirling
Hi folks,
The UAMF are having a four engined or more group build. (Starts the 1st Feb, and runs to 18th March).
So dived in the 'The Stash' and got one of the Short Stirlings out..
Lots of plastic...
and comes with a tractor and four bomb trolleys.
So I've been scouting around for refs and a subject and came across some photos on the IWM Collections search website, of an actual daylight operation by 15 Squadron in 1942....

Short Stirling Mark Is of No. 15 Squadron RAF, meet up with their fighter escort of Hawker Hurricanes over the south-eastern coast of England, on a 'Circus' operation to bomb a target in Lille, France. Photograph taken from the mid-upper turret of one of the three participating Stirlings.
ROYAL AIR FORCE BOMBER COMMAND, 1939-1941.© IWM (C 2027)

Short Stirling Mark I, N3658 'LS-E', of No. 15 Squadron RAF, piloted by Flight Lieutenant Gilmour, encounters heavy flak at a height of 10,000 feet over the French coast, while flying on a 'Circus' operation to bomb a target in Lille.
ROYAL AIR FORCE BOMBER COMMAND, 1939-1941.© IWM (C 2035)
I thought these were amazing photos, so just have to do LS-E.
One of the mods is no mid upper turret, yay! I am a bit scared of doing turrets, as I think I will get all paranoid about putting lots of detail into them. So I'll try to make them busy but not get too anal about it.
Ahh.. I feel lots of Fill'n Sand ahead...
Cheers
Jim
The UAMF are having a four engined or more group build. (Starts the 1st Feb, and runs to 18th March).
So dived in the 'The Stash' and got one of the Short Stirlings out..
Lots of plastic...
and comes with a tractor and four bomb trolleys.
So I've been scouting around for refs and a subject and came across some photos on the IWM Collections search website, of an actual daylight operation by 15 Squadron in 1942....
Short Stirling Mark Is of No. 15 Squadron RAF, meet up with their fighter escort of Hawker Hurricanes over the south-eastern coast of England, on a 'Circus' operation to bomb a target in Lille, France. Photograph taken from the mid-upper turret of one of the three participating Stirlings.
ROYAL AIR FORCE BOMBER COMMAND, 1939-1941.© IWM (C 2027)
Short Stirling Mark I, N3658 'LS-E', of No. 15 Squadron RAF, piloted by Flight Lieutenant Gilmour, encounters heavy flak at a height of 10,000 feet over the French coast, while flying on a 'Circus' operation to bomb a target in Lille.
ROYAL AIR FORCE BOMBER COMMAND, 1939-1941.© IWM (C 2035)
I thought these were amazing photos, so just have to do LS-E.
One of the mods is no mid upper turret, yay! I am a bit scared of doing turrets, as I think I will get all paranoid about putting lots of detail into them. So I'll try to make them busy but not get too anal about it.
Ahh.. I feel lots of Fill'n Sand ahead...
Cheers
Jim
Tuesday, 24 January 2012
Airfix - 1/72 Hampden finished
Well got her done..
Touched up the roundels and then klear coated and tried using oil paints dotted about to do some weathering. I need more practise but I like the look. Vallejo Matte for matt it down, then painted decal strips as the canopy framing, and the framing matted with Klear and flat base.
A fun kit. Have to do a 'proper' one one day.
Cheers
Jim
Touched up the roundels and then klear coated and tried using oil paints dotted about to do some weathering. I need more practise but I like the look. Vallejo Matte for matt it down, then painted decal strips as the canopy framing, and the framing matted with Klear and flat base.
A fun kit. Have to do a 'proper' one one day.
Cheers
Jim
Friday, 20 January 2012
Airfix Hampden - paint
Primed and masked for the codes, and then spent time masking and painting the roundels and fin flash..
lots of fiddling with frisket film, so was keen to unmask after the black was on...
hmm, the frisk pulled a bit of paint, and left a bit of residue, not had that happen before, so a bit of touch up to do, but crikey I like the look of them.
Played about with different colours some dark green and red brown, then light coats of Nato Black, then some black and a bit of Clear blue. Though it seems to have made it very black, I'll have a look in daylight and see what I think, I might spray some dark grey about.
lots of fiddling with frisket film, so was keen to unmask after the black was on...
hmm, the frisk pulled a bit of paint, and left a bit of residue, not had that happen before, so a bit of touch up to do, but crikey I like the look of them.
Played about with different colours some dark green and red brown, then light coats of Nato Black, then some black and a bit of Clear blue. Though it seems to have made it very black, I'll have a look in daylight and see what I think, I might spray some dark grey about.
Airfix Devstator - finished
Got the decal canopy frames on, and had my big oops, carefully counted the
sections, marked them out on maskling tape so I could line them up, got
them on, then started the horizontal frames, and hmmmm, somethings not
right, arrgh I missed a section...... so this devastor has one less
section in the canopy. I also havn't got all the frames there should be
on, it started to look busy enough to me, and I'd had enough.
I did notice the pilot and his seat with rollover frame is too far back,
I'm not sure if I made a mistake, but will check when I do another one.
Knocked up a prop shaft and boss for the prop blur, popped on the tail
wheel, hook, and torpedo, and added some torpedo holding cables?, I
think, not sure if they are right but hey.
A fun build, an the camo scheme is a change to the yellow wing, though I am looking forward to a yellow wing one.
Monday, 16 January 2012
Airfix Devastor - flat coat
I do like Valljo varnishes, thin with water and are quick drying, anyhow Vallejo flat on, and tried put some daylight bulbs in my photo setup..
Airfix Hampden - insignia
Phew a long process, and am eager to see how they look, sprayed white over the blue and then yellow for the A1 fuselage roundel. I'll take the mask off and then mask the whole roundel and can get onto the black..
So hopefully, main colour in the next couple of days.
Airfix Devastator - paint and decals
Well it has been primed and painted, gloss coated and decals added..
really surprised how the decals behaved, they were really thin and placed onto brushed on Klear, really snuggled them down over the corrugations..
a wash ont he control surface panel lines, and then I'll flat coat and do exhaust staining.
really surprised how the decals behaved, they were really thin and placed onto brushed on Klear, really snuggled them down over the corrugations..
a wash ont he control surface panel lines, and then I'll flat coat and do exhaust staining.
Monday, 9 January 2012
Airfix 1/72 Hampden - primed and codes..
Well a week away, and eager to get back to the Hampden.
Before we left I added the home made vac canopies, masked them and primed her..
I've been keen to try masking and painting codes, and a while ago I bought some frisk film, which I used for the Bird dog, and on the captured BF109F, and seemed to work really well, so I have finaly got up the gumption to try it on codes. The decals were shot for the Hampden anyway, and someone suggested doing it as a 485 RNZAF squadron machine, so I printed the code letter out, stuck some cellotape over the top then put frisk over it, and cut out the codes, MEoH to make it easy cuts. I've put them over the primer as that'll be close enough for me as the code colour.
Also cut out some circle masks for the roundels, now it will be on to spraying white for the national markings...
Before we left I added the home made vac canopies, masked them and primed her..
I've been keen to try masking and painting codes, and a while ago I bought some frisk film, which I used for the Bird dog, and on the captured BF109F, and seemed to work really well, so I have finaly got up the gumption to try it on codes. The decals were shot for the Hampden anyway, and someone suggested doing it as a 485 RNZAF squadron machine, so I printed the code letter out, stuck some cellotape over the top then put frisk over it, and cut out the codes, MEoH to make it easy cuts. I've put them over the primer as that'll be close enough for me as the code colour.
Also cut out some circle masks for the roundels, now it will be on to spraying white for the national markings...
Monday, 26 December 2011
Airfix 1/72 Hampden - canopies plus
Built a radar aerial and a gunsight, the fighter Hampden certainly needs a gunsight.
Then stretched up some tube for cannon barrels..
Hopefully paint the canopy sills. add the crew and then attach the canopies.
Thursday, 22 December 2011
Airfix 1/72 Hampden - fin fiddling
I was unsure about the fins, they didn't quite look right...
a bit too tall and square, looked more like Whitley fins.
So this is where we started, compared with the kit fins, thanks to the great input from the guys at the UAMF, I decided to do a bit of shortening and shaping to get these...
follows the Hampden fin shape and slightly taller...
I'm a lot happier with them now.
So canopies to vac, and spinners to sort out, then we'll be almost at paint.
This is too much fun.
Subscribe to:
Posts (Atom)