Wednesday 29 June 2011

Hoimann - Airfix Me109 G6 Part 10

Got the decals on Hoimann..
Only problem is the colour has washed away from the edges a bit, I went really light on the Klear coat when I printed the decals, so that might be the problem.

So mixed up some blue to match and touched up the edges..
Doesn't stand out like the dogs danglers now so I'm happy.

Also tried hand painting the Hoimann name on the nose, I gave up trying to form letters and just went for a suggestion of them. That is my story for lack of ability anyway...

Tuesday 28 June 2011

Bird Dog Part 8 Finished..

Well its finally done.


Well a fun scheme and enjoyable painting, but I did not enjoy the build. I suppose because I had expectations of a straight forward simple build, but with the transparencies and ejector pin marks it wasn't.

Pleased it is done, and is an eye catcher.

Saturday 25 June 2011

Hoimann - Airfix Me109 G6 Part 9

Black well, Nato Black misted over Hoimann..

Captured Bf109F NN644 -White 11 Part 7

Dark earth sprayed on...
I've got to decide whether to freehand the green or mask hmmmmm

Bird Dog Part 7 Paint and UnMask..

Black went really well, apart from finding I was out of black so its Nato Black and a couple of drops of gloss black, that I managed to scrape out of a jar.

A bit of under spray, that I cleaned up with a sharp blade, but I'm really happy with it, I'll let it dry up for a few days, then onto the little detail painting.

Bird Dog Part 6 Paint and Mask..

Got the orange yellow on the bird dog, and masked for the black.
I used frisk film for the shapes on the fuselage, and they are a mirror on either side, a little bit of tamiya tape to tidy up and the masked curves on the nose, and then on with the black....

Saturday 18 June 2011

Airfix 1/72 Whirlwind - pilot and nacelles

Have been playing with a Revell pilot, from their 1/72 Pilots and Ground Crew figure set.
Quite nice figure, though his bottom half is quite large, so will need some bum surgery.

Going to vac my own canopy, so the kit one has had the frames sanded off, and then polished up again. The props and spinners were assembled then, the blades chopped off,  ready for the prop blurs...

Now I'm sure the Airfix exhausts are in the wrong place, they are molded on the naccele centre lines..
 Yet to me they look like they are higher than the centre line and slope down at the rear.
So off they'll come and I'll graft on something...

Captured Bf109F NN644 -White 11 Part 6

Well the pink undercoat for the yellow is a great thing.
  Really gets density right on a thin coat.
Here's my test model with black then a squiggle of pink and a couple of passes of yellow.

Also painted up a prop blur disc for it..
and printed out some decals..

So let the yellow harden up and then mask the undersurfaces.

Hoimann - Airfix Me109 G6 Part 8

Well I gave up on trying to make a mask for the stars, and created some US star roundals ont he PC and printed them out on decal paper.
Plenty of spare ones, as I'm sure to muck a few up.

Hoimann has had the red control surfaces painted..
Mask those off and then on to the black.

Landing Lights...

Landing lights, same bug bear as wing tip lights, so this time cut out the lights, boxed in with plasticard, some slices of plastic tubing that have been rounded at the back, then a couple of slivers of stretched sprue to represent light bulbs.

Once painted then some clingflim / plastic food wrap is stuck into place using Klear, as the light cover...

Clear sticky tape works as well.

Wing tip lights..

Well one of the things with older kits, that I build, is the lack of wing tip lights, some times i don't mind, other times I do. I've tried the tip of cutting the light out and adding a section of square sprue and then sand to sahpe, but is a long winded pain, and I've had the clear plastic fall out before.... so after some thought, I tried cutting the light out, filling the light with Superglue gel, set with accelerator, and then polished up, and here are the results on a Matchbox Wellington...

Lights cut out and some little lengths of stretched clear sprue glued in, and painted silver and blue..

After filling with superglue gel, and set with accelerator, in about three layers, then sanded and polished with Micromesh pads.

Airbrushed prop blur discs.

I like aircraft models in flight, and I like representing the spinning prop, like in the war comics I grew up reading. So here is how I make mine..

I use a mask/template and then airbrush the blur on to a clear plastic disc. I tried freehand masking but the edges of the blur did not look sharp enough.

So after buying a circle cutter I set out to make the mask/template.

Using thin card I marked out the blade postions and a nice width for the segments of the prop blur. (This is a mask for a five bladed prop)

Blur section cut out.

On a sheet of paper, mark out the blade postions, then tack the clear disc over the top.
Tack the mask on top of the clear disc, use the lines for the blades as a guide to make sure the mask is aligned.

Now the airbrushing, I use very very thinned black acrylic (I've used Gunze Aqaeous and Tamiya Semi Gloss Black) so you can slowly build the density of the blur up slowly... (The prop blur here is a three bladed, but its the same kind of mask)
I always start form the centre of the blur to the outside, this gives a darker centre which feathers out to the tip.
First blade blur done, and second started..
Working on the third blade.
Mask removed...
Finished prop blur. If its no the look you are after, its easy enough to wipe the arcrylic off the disc, using thinners or alcohol.

Once satisfied I normally give the blur disc a coat of Klear/Future, as the acrylic is rather delicate.

I have tried a yellow tip on the blur, by using a circle cut out as a mask over the blur, but I've not perfected that method yet.

The template/mask is the trick, and very thinned black paint, slowly building the opacity up. Once you made a mask/template its easy to do a few blurs.

Here is the result..
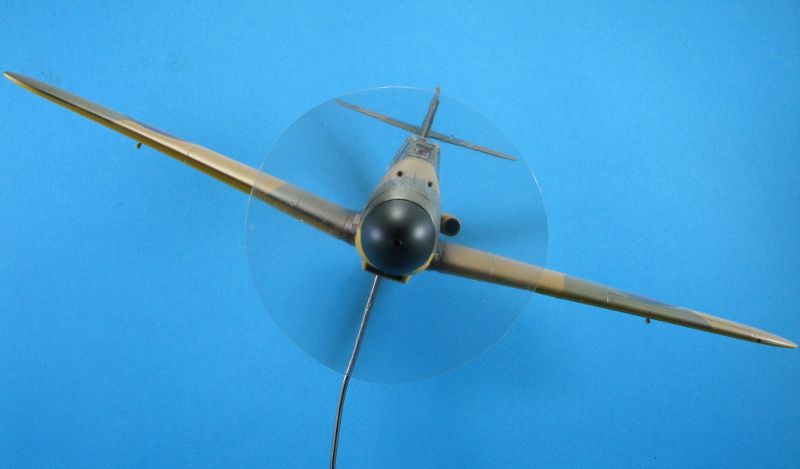
Wednesday 15 June 2011

Hoimann - Airfix Me109 G6 Part 7

Sprayed some white as an undercoat for the red control surfaces and the stars.
Make some masks for the stars next and then the red.

Captured Bf109F NN644 -White 11 Part 5

Painted a pink as an undercoat to the yellow undersurfaces. Its a technique I've seen Mike Grant do, so worth a shot.

Get the yellow on next..

Monday 6 June 2011

Captured Bf109F NN644 -White 11 Part 4

Fuselage is together, the chin scoop front is an insert, which I couldn't put in as Arifx say, due to cementing the engine cowling to each fuselage half, to get a better fit. So it ended up a rubbish fit, I carved the front away, and then used some plasticard to make a new lip.

A bit more fill 'n sand on this and the wings can go on.

Bird Dog Part 5 Primed

Bird doggy has been primed..


Had another ejector pin mark to sand out on the wing. Now its ready for a white spray session as an under coat for the orange, and I think some of the wing is white anyway.

Hoimann - Airfix Me109 G6 Part 6

Well scoop was sorted out, and is now primed up.
Primed with Vallejo primer, and then gave it a light sand with scotch brite pad. Ready for a white spray session as an undercoat for the red parts.

Wednesday 1 June 2011

Airfix 1/72 Whirlwind - box and sprues

Well I'm off starting another one, well I've takent he kit out of the stash and fondled it, and joined the MFAKGB (My First Airfix Kit Group Build) on the Hyperscale Airfix Gb Forum, a fun group of people, with a relaxed sense of model building, so it will get built.

Box and scheme..
Planning on the black wing scheme HE-o-H, I do like the black wing schemes.

Sprues look good, everything present and looks correct.

Decals look ok, the HE H code letters have a bit of white showing on one side, so hopefully a little trim with fix.

Well must finish the other three kits first and then we'll Fill'n Sand this one... great fun.