
Wednesday, 28 September 2011
Airfix Red Arrows Hawk - primer
Applied primer to the Hawk so its all white..
 Its a cheap primer from a hardware store here in, and enamel and it seems to be slow drying, so I'll be giving it a few days before spraying the red.
Biggles - Revell 1/72 Camel - wing aligned
Well after some great advice from OldMan on the 1/72nd Hyperscale forum, I attached the interplane struts to the upper wing, tidied up the joints, removed the cabanes, attached the top wing, then added new cabanes from plasticard.

 Much better result, a bit of tidying up and an paint and I think we'll be there.
I was really nervous about it but it worked out, once I got stuck in.


I was really nervous about it but it worked out, once I got stuck in.
Sunday, 25 September 2011
Airfix Red Arrows Hawk - Intakes
Well it may a 'new tool', but when you get to the intakes she's like an old school build, plenty of fill 'n sand on this one.
 This side had the largest gaps, so used Tamiya basic putty and correction fluid.
 Intakes not too bad from the top, a bit of a step to sand down.
The locating hole for the blade aerial is rather cavernous, and has been filled. Also the round vent towards the fin, has had some correction fluid in it to hide the seam, going to paint it black after main painting, so I'm hoping it'll be ok.
 The under side gets plenty of filler here, the gaps realy were a bit large for a panel line.
I've also left the flap actuator fairings(?) off, I think it will make
the decalling easier.
The under side gets plenty of filler here, the gaps realy were a bit large for a panel line.
I've also left the flap actuator fairings(?) off, I think it will make
the decalling easier.
 Superglue gel on the intakes to fill the vertical seam lines, as they are right on the edge of the lip.
 Finally tonight the canopies got cemented on with Tiger Grip glue. Looks like a bot of a step to fill in the front of the windscreen.


The locating hole for the blade aerial is rather cavernous, and has been filled. Also the round vent towards the fin, has had some correction fluid in it to hide the seam, going to paint it black after main painting, so I'm hoping it'll be ok.


Friday, 23 September 2011
Airfix Red Arrows Hawk - wings..
Well
after having warm fuzzies about my first new tool, I am am losing the
glow, especially after building the Hurricane last weekend.
I'm building wheels up, and Airfix supply two sets of doors, sweet so in they go, and..
![[linked image]](https://blogger.googleusercontent.com/img/b/R29vZ2xl/AVvXsEgtKTfchyphenhypheniMRB9NDceTRXpq5jMSh8IMphvXOntHv2Ory9iKicU7JHO_bQCW-0xfmqSRcu3-UZGxIIsbgnM9T9w0PWgtuK1K1yWjrVTNMJ94Cwhy9zwVSnoMDIsHXwrFhMtGGhR0iWZ0auPv/s800/IMG_2215.JPG)
so filled with card and then join the wings but....
![[linked image]](https://blogger.googleusercontent.com/img/b/R29vZ2xl/AVvXsEjV-rav7CqryU0mI9cBS-zIVy9GewBD_-0UutmKiBWYlAWZpjZgfmevEuZKwSsYVckbpaDIdPVziCisSE4vf9jCfSFbuyRZO5WkLjWOfFSAhL337Cb5NO3qBWjiU-uA6uxGdXYJzTUSbQeI/s800/IMG_2220.JPG)
get this gap, due to..
![[linked image]](https://blogger.googleusercontent.com/img/b/R29vZ2xl/AVvXsEh4-XoXJehLT71g2VceUS5tp0eZeaeNIh5xFZ1RnU64Xb9tb6Jr8okrxs-vKw2yYuJO2Z2csTBnCw9x_2WAkaQ6OMpv5A_K0G5yaua2zb6afw4n6Sp71rulwgKZH5yUtlruGch4kW1HcU9A/s800/IMG_2222.JPG)
the undercarriage leg mount, so sliced off and gap is gone.
Good now attach wings and we have wing root gaps..
![[linked image]](https://blogger.googleusercontent.com/img/b/R29vZ2xl/AVvXsEhXezHD0wVE0qC-RPf6v-yI9PZMXECebCNq1lO9Q9KFTYfKHJ2-ysziTuOSr842wXkc1u0zpx8JQpuQSTAH91YantbmryC-cC2H8MDweiIxP8uaHuvwY2cb6CVJJpftYGFUXnyEB0rnLZae/s800/IMG_2251.JPG)
![[linked image]](https://blogger.googleusercontent.com/img/b/R29vZ2xl/AVvXsEjnuDaaQ37dVAAwrc17lsVEkwekfoiFdN8TeEctG21DrsTCeH12Ya0N2AooinSxH70gy_cSkJpKK6JeSnX0cqCxnFvmy_AodpjC75581RRE3hFveqJ3zUP4rHpWtlxOinLOomFB3iVXhbNb/s800/IMG_2252.JPG)
more card to fill, also we have steps..
![[linked image]](https://blogger.googleusercontent.com/img/b/R29vZ2xl/AVvXsEiCVhct5FjOHUCj9Y1y5VCaF1_EjO6lXXP_ViK85AiKSS0FYHkGjfsjckI5thOAoEOz5vGRB7Koc8IDKzAQVa2GZAWX0fVZ4qNYiX1ot_MDSGxQt4drDa4-yPn0Id6sLwINEyVECkoEeUcG/s800/IMG_2253.JPG)
![[linked image]](https://blogger.googleusercontent.com/img/b/R29vZ2xl/AVvXsEh-reKIbjEGdtO0pvygRk3Xwqw9DJ6hB27jXLiUaV0b_xGHu8BjBRxzyveRPXVtYs-XtULJcP8vkf6t7a5z00J4HCCcXYu5eXyPebnW1Un0UKiC8CuSEDS5aOrHNtabVy7LKoBtc6c_6YMY/s800/IMG_2254.JPG)
I thinned the wing as much as I dared before, they were a lot worse.
Oh well more fill and sanding, so I attached the intake halves..
![[linked image]](https://blogger.googleusercontent.com/img/b/R29vZ2xl/AVvXsEiyB7WY_iyxU8LGmWvhWG0hGQ-ruHsAZnD3lLxpTYX3TrcjeujLMlOaR41mMApxCsFhg3d0ASRuNNNmSfuXAB6d_hd_LCfjLhl2qSUZyCwBNg7qGlpZQklEcgrcdttQt7cbxMRSOEVnFNCB/s800/IMG_2331.JPG)
filled the two mounting holes in them and painted.
Hmm I'm definitely plodding along with this one, and am disappointed with it, I think I had high hopes due to the reviews of it. I might have to dive in to "The Stash" and get old an old Airfix kit....
I'm building wheels up, and Airfix supply two sets of doors, sweet so in they go, and..
so filled with card and then join the wings but....
get this gap, due to..
the undercarriage leg mount, so sliced off and gap is gone.
Good now attach wings and we have wing root gaps..
more card to fill, also we have steps..
I thinned the wing as much as I dared before, they were a lot worse.
Oh well more fill and sanding, so I attached the intake halves..
filled the two mounting holes in them and painted.
Hmm I'm definitely plodding along with this one, and am disappointed with it, I think I had high hopes due to the reviews of it. I might have to dive in to "The Stash" and get old an old Airfix kit....
Sunday, 18 September 2011
Scramble! - Airfix Hurricane in a weekend - finished
Well
after a little family and inlaws party lunch for our three year old, I
snuck in twenty minutes and slapped a Klear/Future Tamiya flat base flat
coat, and stuck on the extra bits.
So she is done at 1620hrs Sunday NZT.
Scrambling away from the airfield...
![[linked image]](https://blogger.googleusercontent.com/img/b/R29vZ2xl/AVvXsEheu6kByFQHxBfNjMitr9NP9SMxSVwSA3YIDnAPwEETSHFKsiAYqamc9FLSb0Okc74eE-P8iSpmiOGzfTnBmWzNiqxFUfcA7m5BzY7bNXHTcPSlk8dv1IaroFl9AxjAy86aOlMNO7hxpakm/s640/IMG_2311.JPG)
![[linked image]](https://blogger.googleusercontent.com/img/b/R29vZ2xl/AVvXsEhqfK81IxjGzcXk7GSBTd12MnF4Xrw7NxHT2dTFe22H92oA4FS5NFnxqmnrBDrfdrbP3z48K65jTI1CBsNwxZbQg01hKO3iVpl_UKy4Cb0hGQjgxZTR76R50RXZkUP5CuJEsXVi99Xunn8-/s640/IMG_2313.JPG)
![[linked image]](https://blogger.googleusercontent.com/img/b/R29vZ2xl/AVvXsEiF2f_Z2XUNp90U7V64q4dMvXMYfExnf-_vqHYrj1AVC-OzZlruvADE7U_yoCjBgCNP3I0yQH60B77b78kqpjsfH_Q_uBJXJVJQKHgHgRpFS5ywaiVwJVryyBDusYKIz8jfINRIpc1FTU6H/s640/IMG_2312.JPG)
![[linked image]](https://blogger.googleusercontent.com/img/b/R29vZ2xl/AVvXsEhoar3eAnPzdmw3vUHzOlXZfJJpe6BxYGJY4E31TKuoMB48eXTADeGpdyYcJmIYnmJsl4116qkNOzw70mHwFI2d4i8wjlU6PvsSKZo0Q_dGPjKMjw4_6ZlmV32-JCxZci9G3fNEUoIx19iL/s640/IMG_2314.JPG)
Orbiting waiting for Squadron Leader and rest of red flight...
![[linked image]](https://blogger.googleusercontent.com/img/b/R29vZ2xl/AVvXsEjU00pM0DsIkcg4H1r-yc8IkaOg37F3k2aT9BSLzU2aON69OwPzZmXCQYLCGpx1UyDQwUGunAA8S_-qU8SIlmE08tgUyfn6UWL_A5Qx-nBBmszh_6rB2eCriqQ6YMbfZfVzjUJyFQdCD6uG/s640/IMG_2315.JPG)
![[linked image]](https://blogger.googleusercontent.com/img/b/R29vZ2xl/AVvXsEjUjj2JIlWwdsCzoofSZaezPcuh5WUp9jPr9YXRhgKZ9eWpfG4537QirMoKf5W5ae-eYrC3aPL93rRCgpGSu6ye9e7WdZ_Vn94ib6qVFKNL9XaroM6wpKCdLmhpHH8EWMQSCHbevCKPjmmi/s640/IMG_2319.JPG)
and hopefully diving in jerry... takka takka takka
![[linked image]](https://blogger.googleusercontent.com/img/b/R29vZ2xl/AVvXsEh_2mHk98Fe34A8qZCRX4sDxtP_wUqAORzD9aNTnPika0ZKiY2fxVbVVhztVn0Lgc6YwUzEG3aaC8scGYo1Hn-HsQJFqEB43t8v2vqtQEJo-be5vCaWkfNnzEFcFDH2_NGxxjdIi7mamZ3o/s640/IMG_2325.JPG)
I think about 12 hours hands on build time, need to work on the brush painting, the skills are a bit rusty, quite few brush marks, and patches, but I'm really pleased with it, I really needed to do a nice quicky clears the cobwebs, and regenerates the enthusiasm.
So she is done at 1620hrs Sunday NZT.
Scrambling away from the airfield...
Orbiting waiting for Squadron Leader and rest of red flight...
and hopefully diving in jerry... takka takka takka
I think about 12 hours hands on build time, need to work on the brush painting, the skills are a bit rusty, quite few brush marks, and patches, but I'm really pleased with it, I really needed to do a nice quicky clears the cobwebs, and regenerates the enthusiasm.
Scramble! - Airfix Hurricane in a weekend - 4
Well it's 1115 hours, Sunday Morning here in NZ.
Hurri is on warming up its engine and on the taxi way..
![[linked image]](https://blogger.googleusercontent.com/img/b/R29vZ2xl/AVvXsEi7c65aHtwteSG4MBF3ocZRiABMbJeyCKyJ3hM6hwlYaAeEvCnE_1zDoq5SGLAHXEhsMnJdRD3ep1CR3gRmm5AO07LvegEObDjMb9jv-7VUKFXLSDDHBM_-4ERkmhjmUmKvzElLTLfydDie/s800/IMG_2309.JPG)
Gave it a gloss coat this morning, and then decalled, and the decals behaved great, a bit of soaking required to get them off the backing, but mostly in register, using Klear/Future to apply them and they are snuggling down nicely over the ribbing and panel lines.
I drybrushed some exhaust stains, and have applied the wing light covers..
![[linked image]](https://blogger.googleusercontent.com/img/b/R29vZ2xl/AVvXsEjwnuUblzGXrqrYYtOAU1oP8B7tRRe3_3YaxB1j0LfdSFkQRSrTtJVWbxvpv4QLqlrYAM6OawDmgGF5wXerLAgPdyFGoF2PYCEIGgrCPmcDlKIVPrE9RyGwewqXp7E6x9rE2xrSLu8I4oid/s800/IMG_2310.JPG)
clingfim, stuck down with klear/future.
I'll brush some flat coat this evening and then hopefully be able to pop on the last bits.
I'm really enjoying this kit, great scramble.
Hurri is on warming up its engine and on the taxi way..
Gave it a gloss coat this morning, and then decalled, and the decals behaved great, a bit of soaking required to get them off the backing, but mostly in register, using Klear/Future to apply them and they are snuggling down nicely over the ribbing and panel lines.
I drybrushed some exhaust stains, and have applied the wing light covers..
clingfim, stuck down with klear/future.
I'll brush some flat coat this evening and then hopefully be able to pop on the last bits.
I'm really enjoying this kit, great scramble.
Saturday, 17 September 2011
Scramble! - Airfix Hurricane in a weekend - 3
Paint
tonight, its been soooo long since I brushed painted a camo scheme,
probably the last time these Humbrol authentics were used...
![[linked image]](https://blogger.googleusercontent.com/img/b/R29vZ2xl/AVvXsEj07SQ6ITSw4eyz2KXgcYnYVbyaQ8gSHkmYrWxhYsQqiZLK1t_h6qyIEglU3HJOQyhaUGr3siQU6Nf05EliW6haNM2OA7b58sP0y3Qeaj97ZAbw8pk6-0__9m3b9_nbojNmBC5r4vijnOLO/s800/IMG_2299.JPG)
so since it would have been alomst mmhhhrrmm years ago, I gave them a whizz with the elecrtic paint stirrer.
Sky on first, and had to grab another tin, the paint was drying realy fast, and not very brush friendly..
![[linked image]](https://blogger.googleusercontent.com/img/b/R29vZ2xl/AVvXsEgV8YuRTXhPciYa4APmbj9si_qAN5UxxQC69uRtMxBiNwDGCtLar1HGshyGCtEO6qpVYCTgXRgbMhD79dgbf4JU9QJ7_NEcnIXXNYGF_IALGF2ApxFMeEuR2owynxTO2GbpEpp0NEsyT-Xl/s800/IMG_2308.JPG)
so I grabbed another Authentics Sky, which was much easier to use. Then black, a test of my free hand lines, not bad, only had a couple of touch ups, not much coffee today so that helped
Top camo on...
![[linked image]](https://blogger.googleusercontent.com/img/b/R29vZ2xl/AVvXsEjdEIh3IVCAdQHFpwI50VPVzTBIljzQpCevq0lVH3cd-tax3E99BqZBaR23wh6GEAoV7wxmIz1Axz7TrIqth2pKrXIfNSWLdul31NTB04PlMmYZqVzKirYNHnGl6l-GYsbclNDiSyCZ-JI3/s800/IMG_2303.JPG)
oh it was so nice not having to mask, and getting all the colours done in one session. took me right back mmhhhrrmm years ago. Then Duck egg blue fuselage band and Brick red for the exhausts, just like mmhhhrrmm years ago, and a bit of silver on the wing landing lights.
Washed the Jim the pilot and painted the canopy frames, a bit wobbly as eyes getting a bit sleepy.
so since it would have been alomst mmhhhrrmm years ago, I gave them a whizz with the elecrtic paint stirrer.
Sky on first, and had to grab another tin, the paint was drying realy fast, and not very brush friendly..
so I grabbed another Authentics Sky, which was much easier to use. Then black, a test of my free hand lines, not bad, only had a couple of touch ups, not much coffee today so that helped
Top camo on...
oh it was so nice not having to mask, and getting all the colours done in one session. took me right back mmhhhrrmm years ago. Then Duck egg blue fuselage band and Brick red for the exhausts, just like mmhhhrrmm years ago, and a bit of silver on the wing landing lights.
Washed the Jim the pilot and painted the canopy frames, a bit wobbly as eyes getting a bit sleepy.
Great fun this building like I used to as an eager lad.
Scramble! - Airfix Hurricane in a weekend - 2
Well snuck in a little of painting before I went to bed,
Little Jim got his colours on..
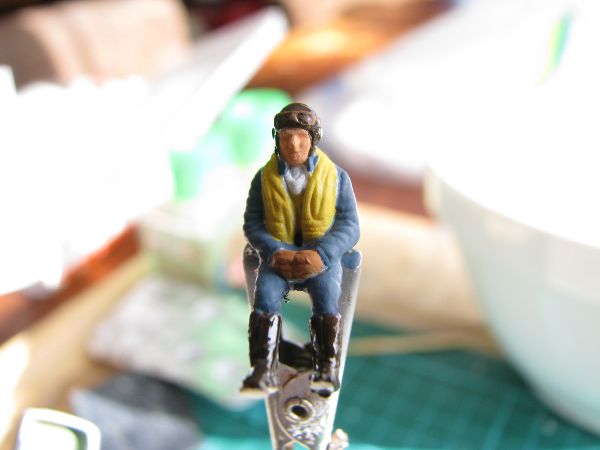
I'll give him a water colour and Klear wash, a flatting and he'll be sorted.
Spinner got painted, and blades snipped, nice fitting, not much to tidy up, just a bit of a step..
 painted up the tailwheel.
Sliced off the plasticard in the wingroots..
 just needed a bit of correction fluid to finish, and the correction fluid used on a couple of sink marks on the nose.
Bit of gapage at the rear of the wing joint, so it was filled with super glue gel..

wheels were painted last night, and this morning once, the rear joint filled a big bit of sprue cemented in for the mount. Also a couple of big sink marks were sorted out, shame about the ribbing, as I lost a bit by the sanding.
A bit of correction fluid for the tailplanes..

and I ran a scriber along the top and bottom of the exhausts..
 they looked too much part of the fuselage to me.
So state of scramble at 1100 hrs Saturday here in NZ.

Sort some lunch out for the kids, then I need to do some weeding in the vegie garden, I don't want to get the airbrush out so it'll be out with the hairy sticks tonight and some Humbrol authentic colours ..
Great fun this..
Tally ho..
Little Jim got his colours on..

I'll give him a water colour and Klear wash, a flatting and he'll be sorted.
Spinner got painted, and blades snipped, nice fitting, not much to tidy up, just a bit of a step..

Sliced off the plasticard in the wingroots..

Bit of gapage at the rear of the wing joint, so it was filled with super glue gel..

wheels were painted last night, and this morning once, the rear joint filled a big bit of sprue cemented in for the mount. Also a couple of big sink marks were sorted out, shame about the ribbing, as I lost a bit by the sanding.
A bit of correction fluid for the tailplanes..

and I ran a scriber along the top and bottom of the exhausts..

So state of scramble at 1100 hrs Saturday here in NZ.

Sort some lunch out for the kids, then I need to do some weeding in the vegie garden, I don't want to get the airbrush out so it'll be out with the hairy sticks tonight and some Humbrol authentic colours ..
Great fun this..
Tally ho..
Scramble! - Airfix Hurricane in a weekend - 1
Scramble, scramble... over on Hyperscale, Allan Buttrick suggested a quick commerative Battle of Britain build. Build a kit like we used to as lads. so i thought I'd have a go, I need a nice ignore the faults build.
So out to "The Stash" and dig out this Airifx Hurricane..
 I have to tweak a couple of things, just can't help myself..
 Added some slices of plastic tube as landing lights.
 and tried to shape the radiator bath more to my liking,
 Nice fitting kit, only real gapage I had was at the wing roots, which I filled with 10thou card, and squishing up with rubber bands. There was two large ejector pin marks on the uderside of the tailplane, but a bit of scraping and sanding and they are gone.
So status after three hours is...
 Let it set up, tidy the seams and then some painting.
A fun build.
Happy Fill'n sand
So out to "The Stash" and dig out this Airifx Hurricane..


So status after three hours is...

A fun build.
Happy Fill'n sand
Monday, 12 September 2011
Biggles - Revell 1/72 Camel - wing alignment
Slow going on this, I think I'm a bit scared of the rigging, gulp..
Got a bit of paint on Humbrol 74 linen as the under surface colour, and I havn't got anything thats close to PC-10 so I'm using Humbrol 75 Bronze Green as the other colour.
Got tot the stage wherer I thought I's pop the cabane struts on, well there's a bit of an alignment issue...
 Not bad from directly above, but...


 oh poo...
Got a bit of paint on Humbrol 74 linen as the under surface colour, and I havn't got anything thats close to PC-10 so I'm using Humbrol 75 Bronze Green as the other colour.
Got tot the stage wherer I thought I's pop the cabane struts on, well there's a bit of an alignment issue...


Saturday, 10 September 2011
Airfix Red Arrows Hawk - fuselage gaps
Put the rear decking on, had to sand down the rear bulkhead a bit so it would fit down..

puttied the seam in the coaming and added a square of plasticard to hide the hole for the HUD. I've put on the fuselage halves of the intakes, as I thought it would be easier painting them.
I had a 'heads up' about the undercart doors being gappy, so I looked at them, and do have a bit of a gap all around...
 so I added strips of 5 thou card to the edges of the doors. I'm hoping I don't get a double panel line...
Found the same gapage with the airbrake door, and it sat a bit low..
 so a bit of 10 thou to raise it up, and some 5 thou on the air-brake edges.
Its nice that Airfx supply seperated undercarriage doors for wheels down option and a single piece wheels up option, and two air-brake doors, an open one and one closed, good stuff.
I'll let the plastic setup and I'll trim the doors. Oh, the nose gear door fitted quite well, sits just a tad low on mine, but I should be able to sand that out.

puttied the seam in the coaming and added a square of plasticard to hide the hole for the HUD. I've put on the fuselage halves of the intakes, as I thought it would be easier painting them.
I had a 'heads up' about the undercart doors being gappy, so I looked at them, and do have a bit of a gap all around...

Found the same gapage with the airbrake door, and it sat a bit low..

Its nice that Airfx supply seperated undercarriage doors for wheels down option and a single piece wheels up option, and two air-brake doors, an open one and one closed, good stuff.
I'll let the plastic setup and I'll trim the doors. Oh, the nose gear door fitted quite well, sits just a tad low on mine, but I should be able to sand that out.
Friday, 9 September 2011
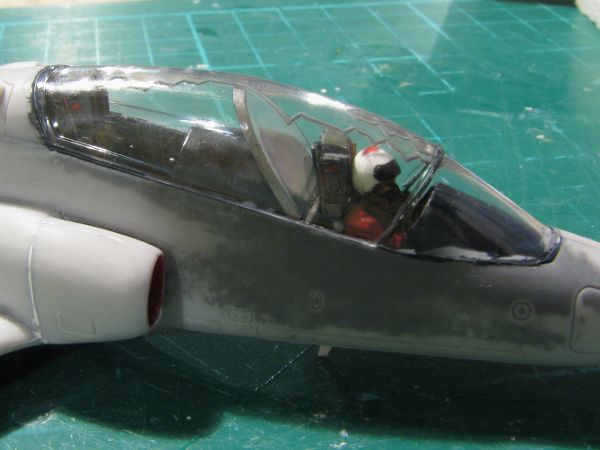
Airfix Red Arrows Hawk - cockpit finished
Well rattling along with this, finished painting the cockpit and pilot.. ready to button up the fuselage.

 My pilot ended up being too large so I had to enlarge the leg holes in the instrument panel and move it forward a bit.
I am really liking this kit, I see more in my future..


I am really liking this kit, I see more in my future..
Subscribe to:
Posts (Atom)