Saturday, 14 July 2012
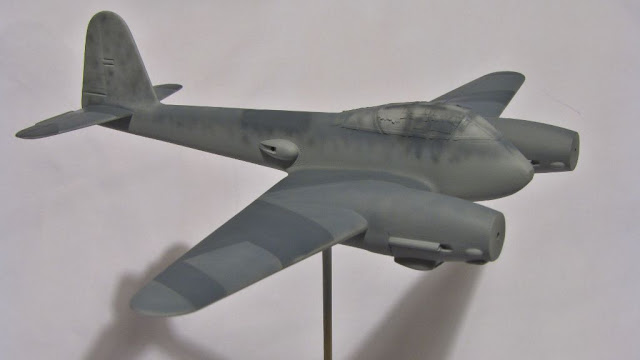
PM 1/72 TA-154 Moskito - finished
Got her finished up this afternoon, and noticed the wing pitot tube had jumped ship just before the photos.. ah well these things happen.
Friday, 13 July 2012
PM 1/72 TA-154 Moskito - masking, paint and decals..
Masked the canopy and added some stretched plastic tube for cannon barrels..
Coat of primer and quite a bit of sanding and priming..Engraved the ailerons...
and flaps. The top wing had engraved flaps and ailerons, while the underside the flaps and ailerons were raised lines.
Bit of spraying, with home mixed colours, I think the 76 looks too dark..
Decals are a mix of spares ones, though the England Blitz is form the Lindberg Me-410.
A bit of exhaust stains, satin coat and we'll be done..
Tuesday, 10 July 2012
Monday, 9 July 2012
PM 1/72 TA-154 Moskito - filling
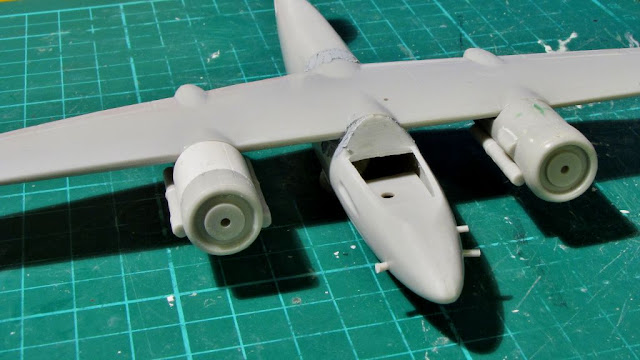
Faired in the canopy and some correction fluid over the joints.
Both nacelles on.
Added some rounded sprue as lights and some palsticard as the rib. I dish them out with a drill bit and add some small pieces of stretched sprue as bulbs.
Both nacelles on.
Lindberg 1/72 Me-410 Hornisse - decals
Well found some decals in the spares, and had an enjoyable time applying them..
Codes and nose art from a Fujimi Me-110 sheet, took a while to come off the backing and were quite brittle. The fin is a triangle form a Matchbox FW-190 sheet, and the crosses form various other sheets.
Codes and nose art from a Fujimi Me-110 sheet, took a while to come off the backing and were quite brittle. The fin is a triangle form a Matchbox FW-190 sheet, and the crosses form various other sheets.
Saturday, 7 July 2012
Lindberg 1/72 Me-410 Hornisse - paint
While the family were out tonight, I got the airbrush setup and got the main colours on.
A very enjoyable time was had. Now I'll have to go through my spare decals and see what I've got.
Cheers
JIm
A very enjoyable time was had. Now I'll have to go through my spare decals and see what I've got.
Cheers
JIm
PM 1/72 TA-154 Moskito - nacelles..
Cockpit painted and all crew in..
Cemented the right hand nacelle on.
also go the tailplane in and canopy, a bit of filelr to blend things in, but the rear of the nacelle will require a bit of shaping..
The nacelle comes to a sharpish edge but the wing fairing is very blunt ans much wider.
Dry fitted the left nacelle..
quite a step, so I'll shim the under side to try and bring the top of the nacelle flush with the wing fairing.
Finished scratch building the replacement air intakes for the engines..
a couple of corner pieces of round sprue, heated to bent to a shallower angle, then the pointed rear faring build up with super glue and talcum power, sanded and scraped to shape, intake opened up with a knife blade. They are not matches for the photos I have but they are better than the lumps that were on them.
I'll fair the canopy in and then add the left hand nacelle.
Cheers
Jim
Friday, 6 July 2012
Lindberg 1/72 Me-410 Hornisse - canopy masked
A well spent hour or so last night and got the canopy masked up..
Strips of tape to define the edges and then Mr masking fluid to fill in. A bit of dark grey for the framing ans to check some seams, a touch of filler and getting close to paint...
Strips of tape to define the edges and then Mr masking fluid to fill in. A bit of dark grey for the framing ans to check some seams, a touch of filler and getting close to paint...
Wednesday, 4 July 2012
PM 1/72 TA-154 Moskito - fill and sanding..
Now this is a cracker of a kit, not for ease of assembly but for weird reason, I'm finding it an enjoyable build..
Looking at reviews and the few builds I've found on the web, it sounds a real dog, but it has real personality, maybe seeing all the negatives about it, it generated that lost puppy feeling... it is softly moulded and has strange surface textures, the upper surface of the wing has engraved hinge lines, but the under surface has raised lines.
The canopy is surprising thin, but does have surface marks on it, that have polished out though, and looks fine with a coat of Klear/Future. Though there is no cockpit detail, just two very upright seats and a control column.
A bit of curvature problems in the fuselage, that needed a bit of scrapping to get a closer fit.
A bit of blending and shaping is needed at the wing /fuselage/canopy joints, there's three different shapes happening at this area.
While looking at some references I noticed that the rear crewman, actually sat further rearward, so out with the electric engraver andremoved the bulkhead..
Now there's room for the crewman, which are two ex Matchbox figures.
A floor and rear bulkhead added, and some sprue side consoles.
Had to add the rear crewman as there isn't room to add him after his console has been built.
Built some radar scopes for the rear guy to look at, and added a seat, armour plate, instrument panel and coaming. A bit of CD case for the window of the rear crewman.
Here is the canopy, not bad. It's had its inside polished and dipped in Klear/Future.
The engine nacelles seem a bit soft and look small in diameter to me, so I wrapped a piece of 10 thou around the nacelle, sanded back the front of the nacelle and scribed some cooling flaps on it.
Looks a bit better to me, without too much radical surgery. Also had to slice the carburettor intake off, and will make some new ones.
Quite an enjoyable build.
Looking at reviews and the few builds I've found on the web, it sounds a real dog, but it has real personality, maybe seeing all the negatives about it, it generated that lost puppy feeling... it is softly moulded and has strange surface textures, the upper surface of the wing has engraved hinge lines, but the under surface has raised lines.
The canopy is surprising thin, but does have surface marks on it, that have polished out though, and looks fine with a coat of Klear/Future. Though there is no cockpit detail, just two very upright seats and a control column.
A bit of curvature problems in the fuselage, that needed a bit of scrapping to get a closer fit.
While looking at some references I noticed that the rear crewman, actually sat further rearward, so out with the electric engraver andremoved the bulkhead..
Now there's room for the crewman, which are two ex Matchbox figures.
A floor and rear bulkhead added, and some sprue side consoles.
Had to add the rear crewman as there isn't room to add him after his console has been built.
Built some radar scopes for the rear guy to look at, and added a seat, armour plate, instrument panel and coaming. A bit of CD case for the window of the rear crewman.
Here is the canopy, not bad. It's had its inside polished and dipped in Klear/Future.
The engine nacelles seem a bit soft and look small in diameter to me, so I wrapped a piece of 10 thou around the nacelle, sanded back the front of the nacelle and scribed some cooling flaps on it.
Looks a bit better to me, without too much radical surgery. Also had to slice the carburettor intake off, and will make some new ones.
Quite an enjoyable build.
Lindberg 1/72 Me-410 Hornisse - assembly
Been working on this one a classic Lindberg kit,
Love the Lindberg instructions.
Found a coupl eof major things with the kit, I checked the length against an Italeri Me-210 and it was the same length, so reckon the fuselage is bit short for a Me-410, ah well. The other thing with this kit that really jumps out is the canopy..
A typical Lindberg rivet fest, very thick, and that joint right down the middle. It laso hasn;t got the bugles/cut ins at the rear that is so obvious ont he Me-210/410, which is a shame.
But it's building up like the other Lindberg's I've built, not bad fitting, once joints are sanded flat, and goes together quickly.
No cockpit detail at all, just the Lindberg recliner seats for the crew.
and with the kit canopy it doesn't matter...
I sanded and polished the seam done and it has been coated in Klear/Future.
Needs a bit of filler to blend the canopy in.
Quite a fun build.
Subscribe to:
Comments (Atom)


